

Expansions rarely stall because a practice isn’t ready to see more patients. They stall because the second location’s rooftop HVAC unit can’t handle four new exam rooms, because the permit reviewer flagged the medical-gas plan, or because a “cheap” retail space needed a $40,000 electrical panel upgrade nobody budgeted for. The clinical side of growth is usually the easy part. The physical space, the timeline, and the costs hiding inside a build-out are what blow up projects.
This checklist covers both halves: the operational build most guides focus on and the commercial real-estate and construction reality they leave out. It’s written for growing practices adding a location, providers, or services, and for the owners and general contractors converting retail or office space into clinical use.
Why a written checklist beats a mental one
Expansion touches finance, compliance, construction, hiring, and payer contracts at once, and the order you do things in matters as much as the things themselves. That combination, many moving parts, several parties, hard-to-reverse decisions, is exactly where a written checklist earns its keep. A clinical review on checklists and translating evidence into practice found that structured checklists reduce error in complex, multi-step processes precisely because they stop teams from relying on memory when the stakes and the variable count are both high.
An expansion is that kind of process. Miss the sequence, signing a lease before you’ve confirmed the space can be converted, or starting construction before payer credentialing is underway, and you pay for it in months of lost revenue. Use the six phases below in order.
Phase 1: Strategy and feasibility (before you commit)
Define the expansion type
“Expansion” means very different things. Adding providers to your current footprint is a staffing and scheduling problem. Opening a second location is a real-estate, licensing, and capital problem. Expanding services, adding operatories, imaging, a procedure room, is a build-out and equipment problem. Each carries different space and capital needs, so name yours first.
Validate market and demand
Confirm the demand is real: patient volume in the target area, the strength of your referral base, and the payer mix you’d actually serve. A location that looks convenient can sit in a saturated market or lean toward payers that don’t support your economics.
Build financial projections and capital
Build a budget that includes far more than rent. Account for build-out, equipment, working capital to carry you through a slow ramp, and a dedicated contingency line. National benchmarking, like the American Medical Association’s Physician Practice Characteristics report, is useful context for how practice size and ownership structures are shifting, worth weighing when you decide how much capacity to add and how to finance it.
Line up financing
Map your options early: conventional practice loans, SBA financing, equipment financing, and the lease-versus-buy question for the space itself. Lenders will want the projections above, so this phase feeds the next.
This is your pre-expansion checklist… Before you sign that second lease, check these vital signs: Your first clinic must nail: • Patient capacity metric …
Phase 2: Choosing and securing the space
This is where most expansion guides go quiet, and where the biggest surprises live.
Site selection criteria for clinical use
Not every commercial space can legally or practically become a clinic. Check zoning for medical or dental use, parking ratios (clinical uses often require more than retail), ADA-accessible entry, patient flow, visibility, and proximity to referral sources. A space that fails on zoning or parking is a non-starter no matter how good the rent looks.
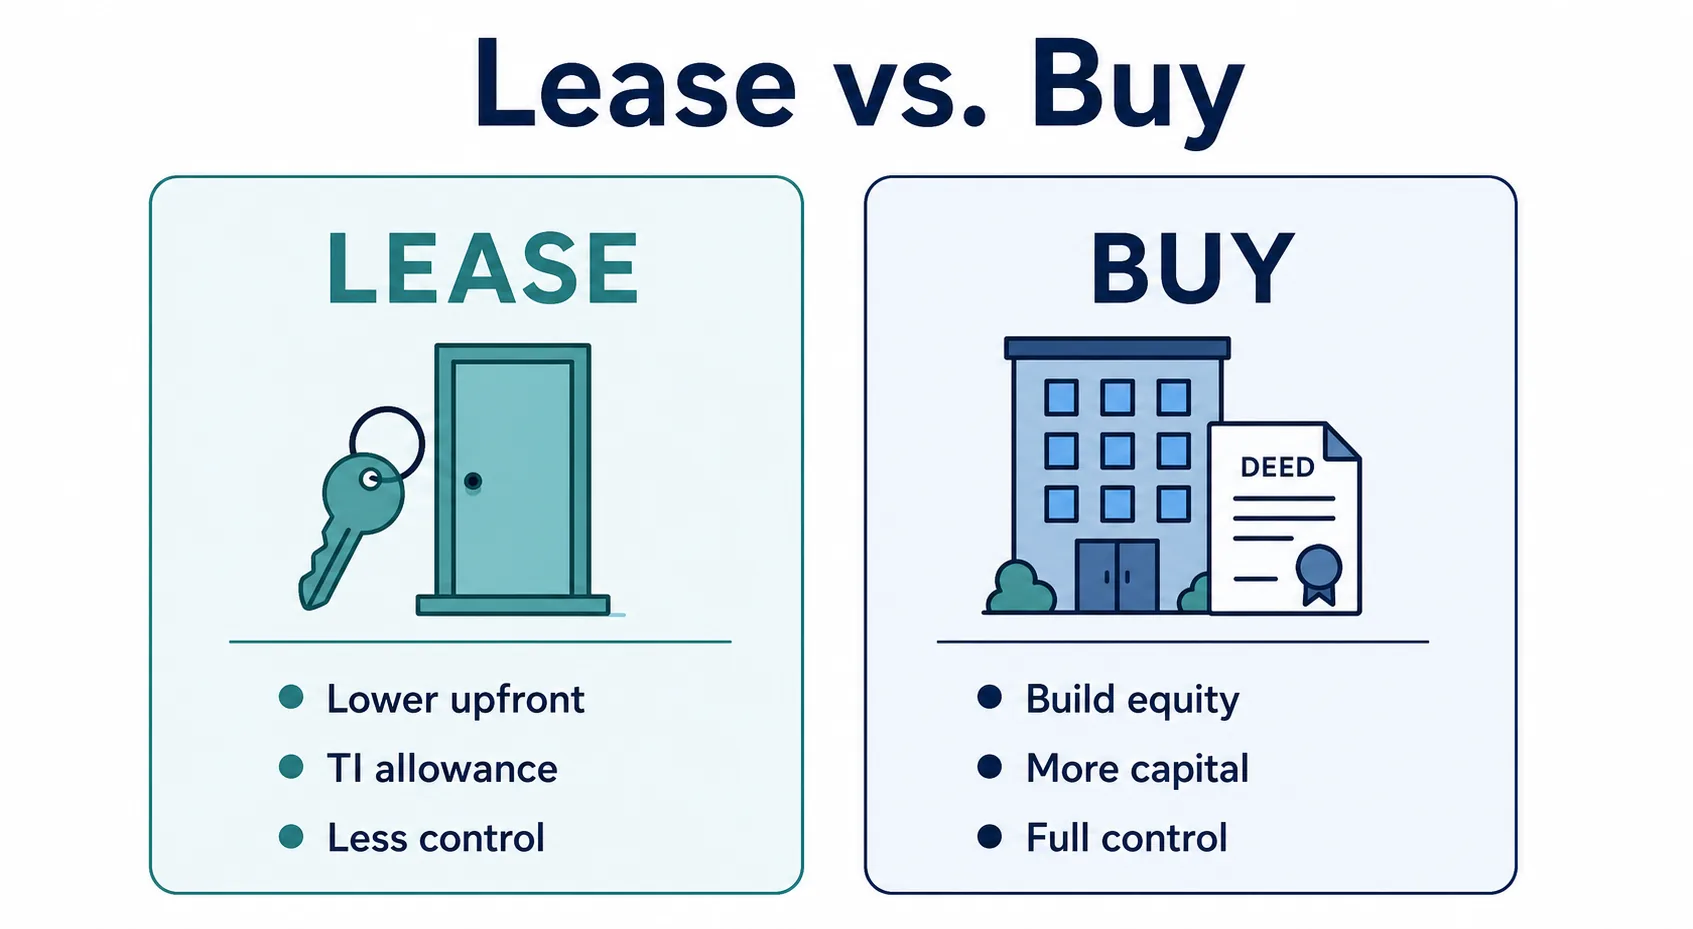
Lease vs. buy, and the letter of intent
Whether you lease or buy, the letter of intent is where you win or lose money. Negotiate the tenant improvement (TI) allowance the landlord contributes toward your build-out, free rent during construction, a use clause that protects your clinical operations, and exclusivity if you don’t want a competitor two doors down. These terms are far easier to secure before you’ve signed than after.
Read the space for clinical conversion
Before you commit, have the building assessed for what conversion actually requires: existing HVAC or rooftop unit (RTU) capacity, the electrical panel’s amperage and available circuits, plumbing stub locations, and structural constraints. These four factors decide whether a low-rent space is genuinely affordable or secretly expensive. A former retail box with an undersized RTU and a maxed-out panel can cost more to convert than a slightly pricier space that’s already close to clinical-ready.
A space that fails on zoning or parking is a non-starter no matter how good the rent looks.
Phase 3: Build-out, permits, and inspections
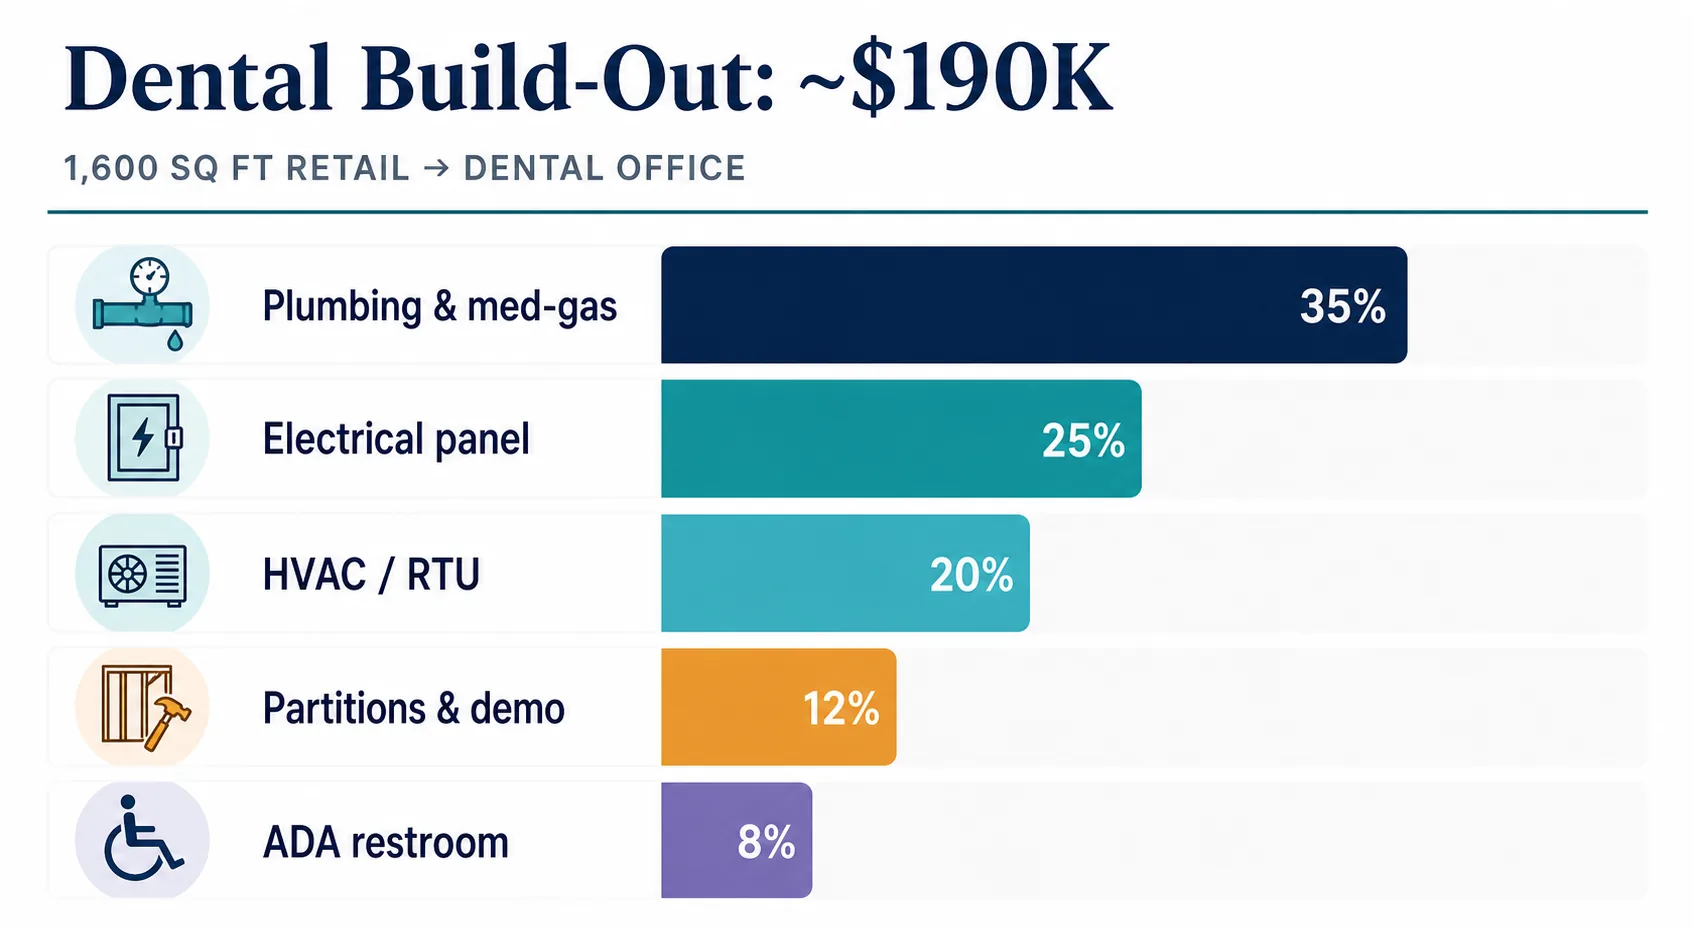
Once the space is secured, the build-out and its permitting drive your opening date. Here’s how it works, using a worked example: a general contractor converting a 1,600-square-foot former retail space into a dental office, with plumbing rough-in for four operatories (including vacuum and compressed-air lines plus a nitrous oxide system), an ADA restroom upgrade, an electrical panel upgrade with dedicated circuits for chairs and X-ray, replacement of the rooftop HVAC unit with a larger RTU and reworked ductwork, and non-structural demo with new partitions, on a budget around $190,000.
What permits a clinical build-out typically requires
A project like that usually needs a package of permits, not one:
- Building permit for the demo, new partitions, and overall scope.
- Plumbing permit for the operatory rough-in, and often a separate medical gas permit for the nitrous oxide, vacuum, and compressed-air systems.
- Mechanical permit for the RTU replacement and ductwork rework.
- Electrical permit for the panel upgrade and dedicated circuits.
- ADA/accessibility review, typically folded into the building permit but inspected on its own.
Permits are jurisdiction-specific and pulled through the local building department. Which ones apply, and under which code sections, is a question for the authority having jurisdiction (AHJ) in your city or county, verify the exact list before you draw up a schedule.
Understand permit fees and the fee schedule
Permit fees are typically valuation-based, a function of the declared construction value rather than a flat rate. Rather than budget from a number you found online, pull your jurisdiction’s published permit fee schedule (most building departments post a current-year version) and run your project’s valuation through it. A figure from another city will mislead your budget.
The inspection process and code sections
Inspections happen in a sequence you have to plan the build around. Rough-in inspections for plumbing, mechanical, and electrical must pass before those systems are covered by walls or ceilings, miss the window and you’re opening finished work back up. Specialty items like medical-gas systems and ADA elements get their own inspections. After rough-ins pass and finishes go in, a final inspection and certificate of occupancy close it out. Building the schedule so inspectors can access rough-in work at the right moment is a core general-contractor responsibility.
Timeline reality
Permit review and inspection lead times routinely set the opening date more than the actual construction does. A four-week build can sit behind a six-week plan review. Ask the AHJ about current review timelines early, and treat those dates as fixed constraints, not soft estimates.
Phase 4: Hidden and underestimated expenses
The costs that wreck budgets
The line items generic checklists never mention are the ones that break budgets: medical-gas and nitrous systems, RTU or HVAC upsizing, electrical panel upgrades, dedicated circuits for chairs and imaging, ADA restroom and entry upgrades, and specialty plumbing for operatories. In the dental-conversion scenario above, several of these individually run into five figures. None of them appear on a standard “start a practice” list.
Soft costs people forget
Beyond construction, budget for the softer costs: architect and engineer drawings, permit fees, inspection re-visits when something fails and needs correction, IT and network cabling, signage, and the temporary loss of revenue while you transition. These add up quietly.
Because of all of the above, build a contingency into any build-out budget. A 10–15% contingency is a common planning convention for construction of this type, treat it as prudent guidance, not a guaranteed ceiling. On a $190,000 project, that’s $19,000–$28,500 you hope not to spend and are grateful to have when the panel upgrade comes in high.
Phase 5: Compliance, licensing, and credentialing
Facility licensing and regulatory obligations
A new or expanded space carries its own compliance load: facility licensing where required, plus CLIA for on-site lab work, OSHA workplace-safety requirements, and ADA obligations for the finished space. Confirm which apply to your specialty and location.
Payer enrollment and credentialing at the new location
Start credentialing and payer enrollment for the new site as early as possible, this is one of the longest lead-time items in the entire project and a direct brake on revenue. A location that’s built, permitted, and staffed but not yet credentialed can’t bill, so begin the paperwork while construction is still underway.
Use data to right-size the expansion
Let your own numbers set the scope. Measuring current capacity, utilization, and outcomes tells you how many rooms or providers the demand actually supports, keeping you from over- or under-building. The discipline of using data to improve medical practice through measurement applies directly here: expansion scope should follow measured demand, not optimism.
Phase 6: Staffing, systems, and launch
Hire and train ahead of opening
Map staffing to the capacity you’re adding and hire early enough to train before the doors open. New operatories or exam rooms without staff to run them are expensive idle space.
Get systems ready before day one
Practice management, scheduling, and billing systems should be configured, tested, and live before the first patient, including the new location’s setup within your existing platforms.
Market the expanded location
Announce the expansion, update your online presence and listings for the new address, and re-engage referral sources so demand arrives when you open, not months later.
Your printable medical practice expansion checklist
Here’s the whole thing condensed into a scannable list you can print and work through:
| Phase | Checklist items |
|---|---|
| Phase 1, Strategy & feasibility | ☐ Define the expansion type (providers / location / services)<br>☐ Validate market demand, referrals, and payer mix<br>☐ Build a full budget: build-out, equipment, working capital, contingency<br>☐ Line up financing (loan / SBA / equipment / lease vs. buy) |
| Phase 2, Secure the space | ☐ Confirm zoning, parking, accessibility, and patient flow<br>☐ Negotiate LOI terms: TI allowance, free rent, use clause, exclusivity<br>☐ Assess HVAC/RTU, electrical panel, plumbing, and structure for conversion |
| Phase 3, Build-out, permits & inspections | ☐ Confirm required permits with the local AHJ<br>☐ Pull the current permit fee schedule and budget from valuation<br>☐ Plan the rough-in → final inspection sequence into the schedule<br>☐ Verify permit-review and inspection lead times |
| Phase 4, Hidden expenses | ☐ Budget specialty items: medical gas, HVAC upsizing, panel upgrade, ADA, plumbing<br>☐ Include soft costs: drawings, fees, re-inspections, IT cabling, signage, transition<br>☐ Set a 10–15% contingency |
| Phase 5, Compliance & credentialing | ☐ Confirm facility licensing, CLIA, OSHA, ADA obligations<br>☐ Start payer enrollment and credentialing early<br>☐ Right-size scope using capacity and utilization data |
| Phase 6, Staffing, systems & launch | ☐ Hire and train ahead of opening<br>☐ Configure and test scheduling, billing, and PM systems<br>☐ Market the new location and re-engage referrals |
Want this as a downloadable, printable PDF to bring to your team and contractor? A takeaway version of the full checklist is the fastest way to keep every phase on track.
Frequently asked questions
What permits do I need to convert a retail space into a clinical or dental office?
What are the most commonly underestimated dental office build-out expenses?
How much contingency should I budget for a medical build-out?
How long does the permit and inspection process take?
Where do I find the permit fee schedule?
Expansion works when the real-estate and operational checklists run in parallel from day one, when the space is being vetted and permitted while credentialing, financing, and staffing move alongside it. Grab the printable checklist to keep every phase visible, and if the space side is where you’re least sure, bring in a commercial real-estate advisor before you sign anything.